Understanding DNS Resolution in OpenShift: A Deep Technical Guide
Introduction
DNS is one of the most critical components in any Kubernetes or OpenShift environment. Every application running inside OpenShift depends on DNS resolution to communicate with other services, databases, external APIs, and infrastructure components.
When a developer deploys an application in OpenShift and it cannot connect to another service, DNS is often one of the first areas to investigate.
This article explains how DNS resolution works in OpenShift, the components involved, common troubleshooting techniques, and how to customize DNS behavior.
OpenShift DNS Architecture Overview
OpenShift uses Kubernetes-native DNS based on the CoreDNS service. Every pod running inside the cluster receives DNS configuration automatically.
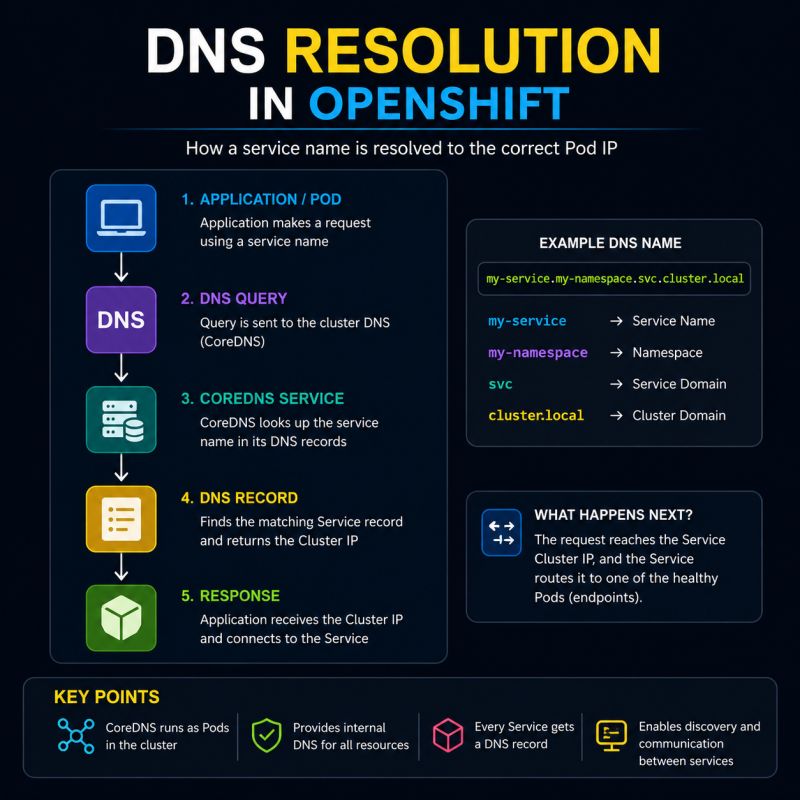
The DNS resolution flow looks like this:
Application Pod
      |
      |
      v
 /etc/resolv.conf
      |
      |
      v
CoreDNS Service
      |
      |
      +----------------+
      |                |
      v                v
Cluster Services    External DNS
A pod does not directly query external DNS servers. Instead, DNS requests are sent to the OpenShift DNS service, which decides whether the request is:
- A Kubernetes/OpenShift internal service lookup
- A cluster-local hostname lookup
- An external domain lookup
DNS Configuration Inside a Pod
Every OpenShift container receives DNS settings through the /etc/resolv.conf file.
Example:
$ oc exec -it my-app-pod -- cat /etc/resolv.conf
Example output:
search myproject.svc.cluster.local svc.cluster.local cluster.local

nameserver 172.30.0.10

options ndots:5
Let’s understand each entry.
nameserver
nameserver 172.30.0.10
This is the Cluster DNS service IP.
All DNS requests from pods are sent here.
You can verify it:
oc get service -n openshift-dns
Example:
NAME       TYPE       CLUSTER-IP
dns-default ClusterIP 172.30.0.10
search Domains
Example:
search myproject.svc.cluster.local svc.cluster.local cluster.local
These domains allow short-name resolution.
For example:
Application code:
curl database
The resolver tries:
database.myproject.svc.cluster.local

database.svc.cluster.local

database.cluster.local
Eventually it finds the correct service.
Kubernetes Service DNS Resolution
The most common DNS lookup inside OpenShift is service discovery.
Suppose we create a service:
apiVersion: v1
kind: Service
metadata:
  name: backend
  namespace: production
spec:
  selector:
    app: backend
  ports:
  - port: 8080
The service automatically receives a DNS record:
backend.production.svc.cluster.local
Any pod can access it:
curl http://backend.production.svc.cluster.local:8080
or simply:
curl http://backend:8080
when running inside the same namespace.
DNS Record Structure in OpenShift
The full DNS format is:
<service-name>.<namespace>.svc.cluster.local
Example:
mysql.database.svc.cluster.local
Breaking it down:
| Component | Value |
|---|---|
| Service | mysql |
| Namespace | database |
| Cluster domain | cluster.local |
How CoreDNS Handles Requests
CoreDNS runs as pods in the OpenShift DNS namespace.
Check DNS pods:
oc get pods -n openshift-dns
Example:
dns-default-x7k9p
dns-default-f82lm
CoreDNS performs several tasks:
- Receives DNS query from pod
- Checks Kubernetes service records
- Returns cluster IP if service exists
- Forwards external queries upstream
Example:
A pod requests:
database.production.svc.cluster.local
CoreDNS checks:
Is this a Kubernetes service?
If yes:
Return ClusterIP
Example:
database.production.svc.cluster.local
      |
      v
10.128.5.25
Debugging DNS Resolution
DNS issues are common during application deployment.
1. Check Pod DNS Configuration
oc exec -it <pod-name> -- cat /etc/resolv.conf
Verify:
- Correct nameserver
- Correct search domains
2. Test DNS Resolution
Launch a debugging container:
oc run dns-test \
--image=registry.access.redhat.com/ubi9/ubi \
-it -- bash
Install tools:
dnf install bind-utils -y
Run:
nslookup kubernetes.default
Expected:
Server:
172.30.0.10

Name:
kubernetes.default.svc.cluster.local

Address:
172.30.0.1
Using dig for Detailed DNS Analysis
The dig command provides more details:
dig backend.production.svc.cluster.local
Example response:
;; ANSWER SECTION:

backend.production.svc.cluster.local.

30 IN A 10.128.2.45
The returned IP is the Kubernetes service ClusterIP.
Common DNS Problems in OpenShift
Problem 1: Service Name Does Not Resolve
Example:
curl backend
Error:
Could not resolve host backend
Check:
oc get svc
Verify:
- Service exists
- Correct namespace
- Correct spelling
Try:
nslookup backend.namespace.svc.cluster.local
Problem 2: DNS Pod Failure
Check:
oc get pods -n openshift-dns
If pods are failing:
oc describe pod <dns-pod> -n openshift-dns
Check logs:
oc logs <dns-pod> -n openshift-dns
Problem 3: External DNS Resolution Failure
Example:
curl https://google.com
fails from pod.
Check:
dig google.com
If internal services work but external DNS fails:
- Check upstream DNS configuration
- Check firewall rules
- Check DNS forwarding configuration
Configuring Custom DNS Forwarding
OpenShift allows custom DNS forwarding.
View configuration:
oc get dns.operator/default -o yaml
Example:
spec:
  servers:
  - name: external-dns
    zones:
    - example.com
    forwardPlugin:
      upstreams:
      - 10.10.10.10
This allows:
*.example.com
queries to be forwarded to:
10.10.10.10
Headless Services and DNS
A headless service does not receive a ClusterIP.
Example:
spec:
  clusterIP: None
DNS returns pod IP addresses instead.
Example:
database.default.svc.cluster.local

10.128.1.10
10.128.2.15
10.128.3.20
This is commonly used with:
- StatefulSets
- Databases
- Distributed systems
DNS Resolution Flow Example
Imagine an application pod:
payment-api
needs to call:
order-service
The application executes:
http://order-service:8080
Resolution process:
payment-api Pod

        |
        v

glibc resolver

        |
        v

/etc/resolv.conf

        |
        v

172.30.0.10

        |
        v

CoreDNS

        |
        v

order-service namespace lookup

        |
        v

Service ClusterIP returned

        |
        v

Connection established
Best Practices
Use Service Names Instead of Pod IPs
Avoid:
http://10.128.4.12:8080
Use:
http://backend:8080
Pod IPs change frequently.
Use Fully Qualified Domain Names for Cross Namespace Communication
Instead of:
database
Use:
database.database-prod.svc.cluster.local
when communicating across namespaces.
Monitor DNS Performance
Large clusters can generate significant DNS traffic.
Monitor:
oc adm top pods -n openshift-dns
Consider:
- DNS caching
- NodeLocal DNS Cache
- Proper resource allocation
Conclusion
DNS in OpenShift provides the foundation for service discovery and application communication. Understanding the flow from /etc/resolv.conf → CoreDNS → Kubernetes services makes troubleshooting much easier.
When debugging DNS problems, always follow this order:
- Check pod DNS configuration
- Verify CoreDNS health
- Test service DNS records
- Validate namespace and service names
- Check external DNS forwarding
A solid understanding of OpenShift DNS will help administrators and developers troubleshoot networking issues faster and design more reliable cloud-native applications.